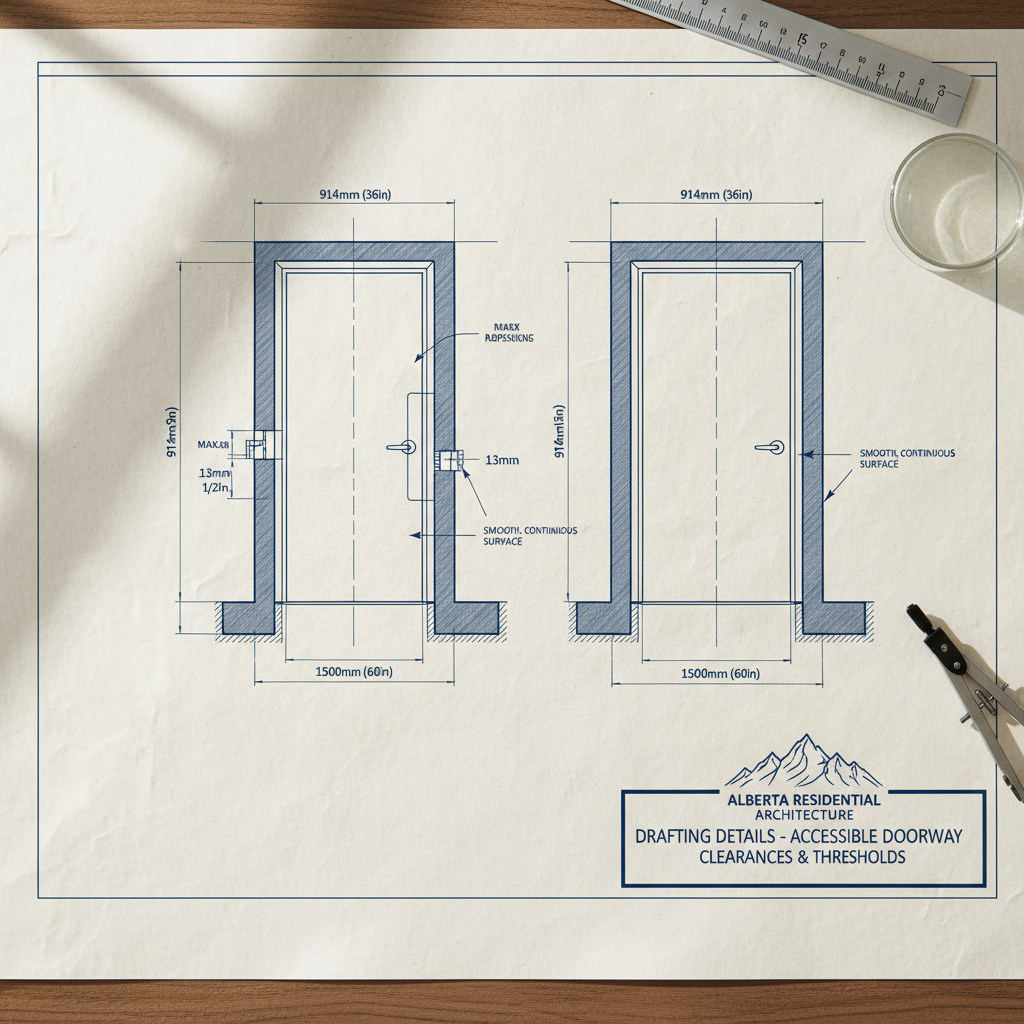
The dimensions and details of doorways play a decisive role in making residential spaces usable for Albertans of all ages and mobility levels. Under the National Building Code - 2023 Alberta Edition (NBC(AE)), precise requirements govern clear opening widths, maneuvering spaces, thresholds, hardware placement, and the crucial surfaces surrounding door openings. Each element, if overlooked, can mean the difference between daily independence and persistent barriers for people with limited mobility, using assistive devices, or experiencing age-related limitations.
Doorway Clear Widths: Where Precision Makes a Difference
A standard hinged door in many older Alberta homes often offers only 30 inches of clear opening or less-a measurement that can prove insurmountable for a modern wheelchair, rollator, or walker. The NBC(AE) addresses this with a minimum required clear width of 32 inches (815 mm), measured from the face of the completely open door (at 90 degrees) to the stop on the latch side. This ‘clear width’ is not to be confused with the nominal width of the door slab itself, which is typically greater.
Understanding the distinction between nominal and clear width is critical in architectural drafting. A 32-inch door may not provide a true 32-inch clear opening. The thickness of the door slab, frame, stops, and even protruding hardware subtract from the usable passage space. When drafting for accessibility, a minimum 34-inch (or 36-inch) slab is often necessary to achieve a consistent, code-compliant 32-inch clear opening, especially when accommodating thicker doors for insulation or security purposes.
Common scenarios amplifying the need for generous clear widths include:
- Bedrooms repurposed as main-floor suites after a family member’s injury or aging-in-place considerations arise
- Ensuite bathrooms where assistive equipment is suddenly required, necessitating retrofit solutions
- Side or rear entries often overlooked in the design phase, but which later prove to be preferential access routes for residents with disabilities
In multi-leaf door setups (such as double doors between accessible suites and patios), the code mandates that at least one active leaf must independently provide the minimum clear width. Drafters must specify hardware and astragal details to guarantee this criterion is met in built reality, not just on paper. Failing to allow for the thickness and overlap of double-leaf door components is a frequent design oversight, with substantial accessibility consequences.
Height is equally pivotal. NBC(AE) mandates at least 80 inches (2,030 mm) of clear height for accessible doorways. Low headroom is not simply inconvenient; it represents a severe hazard for wheelchair users with headrests, high-seated mobility devices, or anyone pushing larger equipment or furniture. Moreover, non-conforming heights in secondary entries, such as basement walkouts or garage connections, can undo the investment in accessible main-floor design, undermining the integrity of a whole-home accessibility approach.
Drafting Strategies for Door Clearances
- Specify door frame details in plan and elevations, including jamb profile, stop dimension, and hardware position, to preserve usable clear width.
- Locate all switches and control panels outside the arc of door swings to maintain true accessibility. This prevents bottlenecks and allows unencumbered side reach from a seated position.
- Detail swing clearance arcs and ensure no built-in furniture, plumbing chases, or structural projections invade the required clear zone.
- Call out oversized doors (34 inches or 36 inches nominal) as standard for accessible circulation paths.
Essentials of Maneuvering Clearances: Space to Approach, Operate, and Pass Through
Accessible design is not merely about the passageway width; it is about the surrounding space that allows a resident or visitor to approach a door, operate its handle, open the slab, and move through without impediment. The NBC(AE) articulates these requirements specifically, differentiating between approaches on the push and pull sides of doors, as well as distinguishing between front and side approaches.
Front Approach: Pull and Push Sides
On the pull side, where a door swings towards the user, a generous maneuvering rectangle-no less than 60 inches (1,525 mm) deep from the face of the door and 18 inches (455 mm) wide beyond the latch side-is required. This accommodates the large turning radius of a wheelchair, the reach of a person using crutches, or a parent guiding a child with mobility aids. The wider zone beyond the latch side is critical for aligning alongside the handle and pulling the door open without awkward, energy-intensive pivots.
On the push side, where the door swings away, at least 48 inches (1,220 mm) of depth is mandatory. Doors incorporating closers and latches-a common feature on garage, exterior, or secured interior entries-require an extra 12 inches (305 mm) beyond the latch side to accommodate the added resistance and complexity these mechanisms create. In practice, neglecting this detail can render doors inoperative for many users, despite conforming to width requirements.
Side Approaches: Hinge and Latch Sides
Real-world layouts often force individuals to approach a door at an angle, particularly in corridors or tight vestibules. The code prescribes dedicated maneuvering rectangles for these ‘side approach’ scenarios:
- Approaches from the latch side (parallel to the door, with handle accessible): requires enough width for a wheelchair to align and pull the door open in an arc.
- Approaches from the hinge side (parallel, but handle farther away): relies on increased diagonal and lateral clearance to account for the increased reach and arc needed to access and operate the door.
Detailed architectural floor plans and reflected ceiling plans must document these zones, accounting for door swings, furniture, millwork, plumbing, and even radiator positions. Too often, what appears possible in a stripped-down CAD plan becomes a practical impossibility when trim, heat registers, or electrical service are installed after-the-fact. Sophisticated drafting practices incorporate overlays and 3D modeling to validate every scenario before construction begins.
Collaboration for Success
- Include maneuvering clearance diagrams in permit submissions, ensuring both builder and inspection authorities recognize the intended accessible envelope.
- Work with mechanical and electrical sub-consultants early, coordinating panel boxes, heat sources, and device locations so as not to infringe on maneuvering zones.
- Advocate for end-user walkthroughs of plans-either digital or physical mockups-to validate comfort and function before finalizing details.
Threshold Standards: Smoothing Transitions, Removing Barriers
Even the smallest step or lip can be an insurmountable barrier for a wheelchair or a trip hazard for someone with reduced vision or poor balance. The NBC(AE) limits the maximum allowable threshold height for all accessible doorways to 1/2 inch (13 mm). Any threshold topping 1/4 inch (6.4 mm) in vertical rise must be beveled with a slope no steeper than 1:2, creating a gentle, navigable incline rather than a jarring or slippery edge.
For existing or altered structures, the code is slightly more permissive, allowing thresholds up to 3/4 inch (19 mm), provided both sides are beveled at the same maximum slope. Never should any threshold form a vertical rise greater than 1/4 inch without sloping-such details can easily trip a cane user or halt a powered mobility device cold.
Translating these abstract dimensions into practical solutions calls for careful material selection, tight construction tolerances, and thoughtful transition detailing between floor finishes. Differences in substrate thickness, underlayments, or weatherproofing at exterior doors must be anticipated and addressed during the drafting phase, not left to on-site improvisation.
Application in Wet and Exterior Locations
- Exterior-grade thresholds at entries must both repel water and meet accessibility slopes; proprietary aluminum or composite saddle thresholds with molded ramps offer reliable solutions.
- Deck or patio doors often present a challenge, where required drainage slopes and insulation layers threaten to exceed the 1/2-inch (13 mm) maximum rise. Careful cross-section drafting, illustrated in details for both summer and winter thermal expansion, is essential.
- Bathroom and shower room transitions sometimes call for creative solutions in waterproofing and underlayment selection to maintain a low, properly beveled transition from dry rooms to wet areas.
Specifying the appropriate hardware and sealants further enhances both weather resistance and accessibility at thresholds. Frequently, adding a compliant threshold detail at the outset is vastly more cost-effective than attempting retrofits after hand-over, when even 1/8 inch of excess height can prevent a home’s full use.
Hardware for Accessibility: Ease in Every Operation
The best-planned wide, smooth doorway still fails its purpose if the handle, lock, or latch is too high, too stiff, or requires awkward wrist movements to operate. NBC(AE) stipulates that all operable door hardware must be usable with one hand and must not require tight grasping, pinching, or twisting of the wrist-features crucial for individuals with arthritis, upper limb coordination difficulties, or limited strength.
Hardware (including handles, pulls, thumb latches, locksets, and actuators) must also be mounted between 34 inches (865 mm) and 48 inches (1,220 mm) above the finished floor. Mounting outside this zone can render the whole system inaccessible, particularly for seated users or those with limited reach.
Practical Hardware Solutions
- Lever-style handles over round knobs: levers do not require grip strength or twisting, permitting use with elbow, closed fist, or assistive hook.
- Keyless, electronic, or RFID-operated entry hardware: these minimize dexterity demands and support 'smart home' integrations.
- Continuous hinges and 'push-pull' plates at key doors (especially suite entries or bathrooms): simplifying movement when doors need to swing freely without springs or closers.
Within drafting documents, specifying hardware models, mounting heights above finished floors (AFF), and template installation diagrams prevents errors at the construction stage. Verifying with builders that finished floor assemblies, substrates, and door construction will land installation heights within the permissible range is a critical part of coordination.
Floor Surfaces and Level Changes: Safe Passage at Every Transition
Doorways and their required maneuvering clearances must always be set within stable, firm, and slip-resistant floor finishes. Carpet, tile, laminate, vinyl, or resilient flooring all have different friction coefficients, compressibility, and surface evenness. For wheelchair users, deep-pile carpets or soft underlays can sap energy and make threshold crossing almost impossible. For those at risk of falls, high-gloss tiles or polished concrete can introduce dangerous slip risks.
Level changes within the maneuvering clearances are strictly prohibited under NBC(AE), barring only compliant thresholds. Abrupt steps, ramps, or even minor differences in floor finish thickness can present unacceptable hazards and destroy the usability of a nominally accessible space.
Key Floor Detailing Approaches
- Select and specify non-slip, low-pile, tightly secured carpet or hard flooring at door approaches.
- Draft section details illustrating how different floor assemblies-such as tile in a bathroom meeting hardwood in a hall-will meet flush, using reducers or underlayments as required.
- Enforce consistency between architectural and interior finish schedules to prevent conflicts between accessibility requirements and aesthetic upgrades in later project phases.
Coordination with flooring suppliers and installers is essential. Even reputable contractors may underestimate the accessibility risks posed by trim strips, transition molds, or the cumulative build-up of multiple substrate layers. Annotated finish plans and enlarged detail callouts in construction sets can forestall these oversights.
Doors in Series: Navigating Vestibules and Airlocks
Vestibules-a common feature in Alberta homes to provide thermal buffering-present unique challenges for accessible passage. When two doors are arranged in series, as at main entry vestibules or between a house and attached garage, the NBC(AE) specifies that the space between closed doors must be at least 48 inches (1,220 mm) deep, plus the width of any door leaf swinging into the intermediate space.
This prevents a wheelchair user or anyone using a stroller or walker from becoming trapped in a pinch point between doors. It also allows sufficient space to open the second door while the first remains partially closed behind, preserving privacy, thermal efficiency, and personal safety.
Drafting Considerations for Series Doors
- Run clearance arcs for each door leaf in plan, confirming that maneuvering spaces never overlap in a way that would trap users.
- Consider alternative configurations-sliding doors, automatic openers, or offset entries-where space is constrained.
- Sequence the operation of opposing doors (for example, garage-to-home and garage exterior door) to prevent conflict and undue delay in entering or exiting, especially in emergency egress scenarios.
When renovating older homes or adding a secondary suite with a required vestibule, this section of the code particularly demands careful measurement and often creative frameworks. Predrafting as-built conditions is critical to assess feasibility before proposing accessible upgrades.
Beyond Minimums: Best Practices for Deeper Accessibility
Meeting code is vital, but the most successful accessible homes push beyond the basic standards to ensure real-world usability, dignity, and comfort. Several practical strategies emerge from advanced drafting and universal design principles relevant to Alberta’s architectural landscape.
Automatic Door Openers
Providing power-operated or automatic door openers at key entries, bathrooms, or suites dramatically improves accessibility for individuals with limited strength or coordination. Prewiring for future accommodation at each designated accessible door allows inexpensive upgrades if occupant needs change. Drafters should designate actuator switch locations (at both standing and wheelchair height), unobstructed approach paths, and ensure door swing arcs remain clear of obstacles.
Visual and Tactile Indications
Incorporating tactile signage, color-coded frame finishes, or raised profiles assists people with low vision or perceptual impairments in finding and operating doors safely. In open-plan homes, doors to critical spaces (like accessible bathrooms or exits) can be highlighted with contrasting colors or textures. Hardware with integrated Braille or high-contrast markings furthers ease of use for all.
Regular Maintenance for Long-Term Accessibility
Accessibility depends on both initial design and ongoing performance. Weather stripping that creeps out of alignment, thresholds that swell with moisture, or hardware that stiffens over time can defeat an otherwise well-designed entry. Drafters should specify robust, field-tested components and schedule post-occupancy checks within project warranty periods.
Planning for Aging and Changing Needs
Future-proofing design details supports multi-generational households and allows homes to adapt to the changing health status of owners or occupants. Drafting for wider doors, generous maneuvering zones, and structural reinforcement for future grab bar or hardware installation adds negligible incremental cost during construction but immense value over the life of the residence.
Common Pitfalls and Remediation Tips in Drafting for Doorway Accessibility
Many accessibility failures originate not from willful neglect of code, but from misunderstandings, outdated practices, or late-stage changes during construction. An experienced drafter is alert to the subtleties that often cause problems in built work.
- Failing to account for door hardware swing: Oversized handles, panic bars, or decorative pulls frequently steal critical fractions of an inch from clear openings. Indicate actual hardware blocks in every section and plan.
- Underestimating finish build-up: Adding tile, backed carpet, or additional underlayment post-drafting can nullify previously compliant threshold heights. Include all layers in detail sections and call for site verification before installation.
- Overlapping maneuvering spaces with furniture zones: Space needed for beds, nightstands, or appliances can encroach on required clearances. Prepare furniture plans to overlay with circulation diagrams-an essential for secondary suite approvals.
- Assuming standard hardware is accessible: Not all lever handles are created equally; specify low-resistance, D-shaped, or paddle-style devices over spring-loaded, ornately curved products that challenge weak or arthritic hands.
- Not verifying finished heights from subfloor to final top of flooring: Installation variances can easily push hardware outside the required 34 to 48-inch range, causing non-compliance after inspection.
Drafting Documentation for Accessible Doorways: A Checklist for Success
- Annotate floor plans with all clear opening dimensions-specify method of measurement (from open slab face to stop, slab thickness deducted).
- Include maneuvering clearance rectangles for each accessible door type and approach scenario-plan and elevation formats.
- Detail threshold cross-sections, showing actual materials, slopes, and finished floor interfaces. Specify maximum dimensions and tolerances.
- Call for all hardware products in finish schedules, including mounting heights AFF and operability standards.
- Flag any doors in series with explicit dimensioned separation and swing direction notes.
- Include notes directing contractors to maintain specified surface performance (firm, stable, slip-resistant) within all maneuvering zones, and to connect with the design team for any late-stage material or height deviations.
- Coordinate accessibility scope with engineering drawings for building systems (HVAC, electrical, plumbing) to prevent obstructions or equipment encroachment.
Coordination with Code, Permitting, and Inspection
A successful accessible home project demands early and ongoing coordination-not just among drafters, designers, and builders, but with municipal permitting officers and code inspectors. Including the complete scope of accessible details in permit sets ensures that both review time and post-framing corrections are minimized. Site visits at framing and finish installation can catch deviations before occupancy, when remediation is cheapest and least disruptive.
When in doubt, consult the NBC(AE) directly-requirements change with updates to code, and interpretations can shift with new accessibility standards or judicial decisions. Working proactively with local authorities, bringing questions to pre-application meetings, and documenting all agreements and variances helps safeguard all project participants from costly errors or legal exposure down the road.
Retrofitting for Accessibility in Alberta Homes
Adding accessibility to existing homes in Alberta is both a technical and social necessity, as thousands of homeowners and residents age or face injuries annually. While certain threshold heights and dimensions are slightly relaxed for altered buildings, the principles remain: prioritizing unimpeded access, minimizing level changes, and maximizing maneuvering room wherever space allows.
Architectural drafters engaged in accessibility retrofits for private homes, secondary suites, or attached dwelling units must carefully document as-built conditions and propose interventions that improve usability without introducing new hazards. Short of full-scale reconstruction, many accessibility gains can be realized through selective widening of critical doorways, installing compliant thresholds, and replacing knob hardware with levers. Where local conditions do not permit full compliance, documentation should explain constraints, and proposed work should push usability as far as possible within the envelope of the existing structure.
Case Studies: Accessibility Challenges and Solutions in Alberta Homes
Case Study 1: Bungalow Main Floor Renovation
A 1970s Calgary bungalow, originally designed with 30-inch interior doors, is renovated to add a main-floor accessible suite for an aging parent. Key challenges include:
- Narrow hallways limiting turning radii outside bedroom and bathroom doors
- Thick carpet and underlay creating an unintentional 3/4-inch step at all thresholds
- Legacy brass knob hardware installed at 51 inches above the finished floor
Drafting solutions:
- Relocate select doorway openings for direct, diagonal access to maximize maneuvering zones
- Specify 36-inch nominal door slabs, clear-stop framing, and square-cornered lever hardware at 36 inches AFF
- Detail flush hard-floor transitions and compliant, beveled aluminum saddle thresholds at each interface
Case Study 2: New Two-Storey Home with Accessible Suite Over Garage
An infill development in Edmonton includes a secondary suite above an attached garage, intended for aging-in-place relatives or future accessible rental use:
- Main unit and suite both have direct exterior entries, each with a vestibule
- Designer initially proposes 32-inch doors as a standard, without field testing arc and furniture placement
- Access to mechanical room is via a narrow side corridor with a door in series
Drafting corrections and improvements:
- Model full furniture layouts and side-approach arcs, increasing main door width to 36 inches and reorienting swing to clear maneuver zones
- Enlarge vestibule by 8 inches to provide more than 48-inch separation between doors, including outswinging storm doors installed post-finish
- Coordinate HVAC, switching, and panel locations outside maneuvering paths, ensuring code conformance and long-term flexibility
Case Study 3: Accessible Patio Access in a Slab-on-Grade Home
Ground-level patio access is critical to an Alberta homeowner using a scooter. Original plans include standard patio sliders with a 1-inch raised track and slope down to exterior grade. Problem points include:
- Threshold exceeds 1/2-inch rise, with no slope or beveled transition
- Wall switch for exterior lighting is hidden behind panel, outside maneuvering zone
- Crushed stone patio finish impedes smooth transition
Drafting and construction fixes:
- Adopt a zero-step, low-profile accessible threshold system for the sliding patio door, carefully reviewed via section details for drainage management
- Relocate lighting controls into clear zone, with a large push-pad actuator
- Specify a stabilized, compacted limestone paver field or poured concrete at exterior side, detailed flush with the door threshold
Looking Forward: Elevating Accessibility in Alberta Residential Drafting
As the population ages and universal access becomes a central value in Alberta’s housing market, the bar for doorway accessibility is moving beyond minimums. Practical, flexible drafting approaches-rooted in both code expertise and empathy for daily lived experience-are equipping residential homes to serve all users, all the time.
By embedding accurate, realistic clearance, threshold, surface, and hardware details in every plan set, architectural drafters support not just code compliance, but independence, comfort, and safety for residents and visitors alike.
For industry-leading drafting detail and accessible design excellence in the Calgary region, Kingsway Drafting & Design stands ready to help.